
Technology Background
Cassava takes a pretty long time to be ready for harvest, usually between 8 and 18 months. This lengthy growing period means that the times to plant and harvest do not always match up with the best seasons for each task.
When it is not the right time to plant, if the harvested cassava stem cuttings are just left out in the field without any proper care, they will be at the mercy of all sorts of environmental threats. In dry areas, the stems lose water fast, drying out and wilting until they can no longer sprout. In places where winter gets cold, frost can damage the stem cells so badly that the damage cannot be fixed, turning the stems mushy and rotten. Too much rain is also a problem. It leaves the soil waterlogged, which lets fungi and bacteria grow easily and causes the stems to rot away. Even in hot weather, leaving the stems exposed for too long speeds up their breathing process, using up all their stored nutrients. Sometimes this even makes them sprout too early, which means they are no good for planting in the next season.
That is why good cassava stem storage is necessary for steady farming. These methods keep stems healthy during off-planting months, so farmers do not have to rush to plant right after harvest. Instead, they can plan flexibly around weather, market demand, and available labor/supplies.
Key Measures for Stem Storage
1. Preparation Stage
The first key step to storing cassava stem cuttings is picking the right spot and digging storage pits or caves (see Figure 1). The spot needs to check three boxes: it should be protected from strong winds, which keeps the stems from drying out too fast; it should get some sunlight, since sunlight keeps the storage area’s temperature steady and kills harmful germs; it also needs good drainage, so water does not pool up and make the stems rot.
Dig the pits or caves big or small depending on how many stems you have, bigger for more stems and smaller for fewer. But pits and caves need different care. You have to dig new storage pits and clean them thoroughly every year to get rid of old dirt and germs. Storage caves, though, can be used year after year once they are dug properly. Even so, you need to disinfect them fully before each storage season. You can use a disinfectant or just let sunlight shine into the cave—either way kills hidden pests and germs.

Figure 1: Cassava stem storage pit (left) and storage cave (right)
2. Operation Process
2.1 Cutting the stems
Cut cassava stems on a sunny day. Make sure you pick stems that are healthy, with no signs of pests or disease.
Once you have the right stems, cut off both the top and bottom ends. The top is not fully mature and has fewer viable buds. The bottom often touches the soil, so it is more likely to rot. Trimming these parts ensures you only keep the middle section of the stem for storage. This middle part is the healthiest and most viable.
Then, tie the prepared stems into bundles with sturdy rope. Put 15 to 20 stems in each bundle. This quantity is ideal. It makes the bundles easy to handle and transport. It also allows for good ventilation inside the bundles. Good ventilation is essential to prevent heat and moisture from building up.
2.2 Transporting the stems
Once the stems are cut and bundled, you must transport them to the prepared storage pits or caves as quickly as possible. Try to finish the transportation within 24 hours after cutting. This short time frame is crucial. Prolonged exposure of the cut stems to the outside environment will raise the risk of moisture loss, mechanical damage and pathogen infection.
You need to take proper measures during transportation to protect the stems from mechanical damage. You should also cover the stems with a waterproof cloth. This will shield them from rain or other moisture sources that could cause rot.
2.3. Arranging the stems
Once you get the stem bundles to the storage site, lay them neatly inside the storage pits or caves. If you have a large number of stems to store, it is best to arrange the bundles in separate piles instead of stacking them all in one mass. This setup boosts airflow between the bundles. Good airflow helps let out the heat that the stems produce as they respire, and it lowers the risk of heat buildup that can damage the stems.
The way you arrange the bundles is also a bit different depending on whether you’re using pits or caves. What is more, the follow-up steps for these two storage methods are quite different from each other (see Figure 2).

Figure 2 Arrangement of the cuttings
2.4 For Storage Pits
2.4.1 Installing ventilation holes
Once the stem bundles are neatly arranged inside the storage pit, the next step is to set up ventilation holes. The number of ventilation holes you need depends on the size of the pit. Larger pits require more holes to ensure enough air flows through, while smaller pits can get by with fewer.
Ventilation holes are key to keeping the stored stems in good shape. They let fresh air into the pit and let out carbon dioxide and other gases that the stems produce as they respire. This air flow helps control the temperature and humidity inside the pit, stops harmful gases from building up, and keeps pathogens from growing.
You can make these ventilation holes using bamboo tubes or PVC pipes. Just insert the tubes or pipes into the pit at proper intervals and depths to make sure air exchanges effectively (see Figure 3).
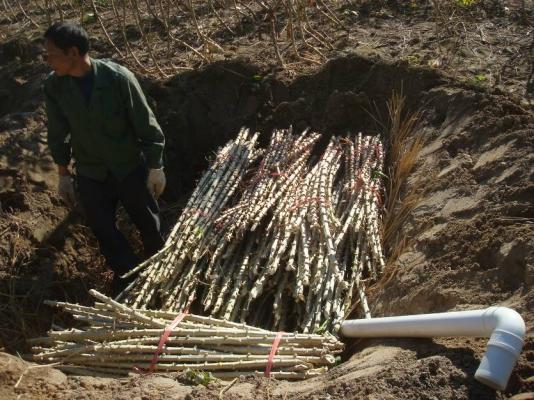
Figure 3 Install ventilation holes
2.4.2 Covering with shade net and soil
Once the ventilation holes are installed, lay a layer of shade net over the top of the stem bundles. The shade net has several uses. It blocks direct sunlight from getting into the pit, which would otherwise raise the temperature inside and cause the stems to lose moisture. It also keeps pests and small animals from getting into the pit and damaging the stems.
After covering with the shade net, spread a layer of soil evenly over it. The soil layer should be 5 to 8 centimeters thick. This layer of soil works as an insulator, helping keep the temperature and humidity inside the pit stable. It also blocks out more sunlight and keeps pests away. On top of that, it helps hold moisture in the pit to make sure the stems do not dry out (see Figure 4).
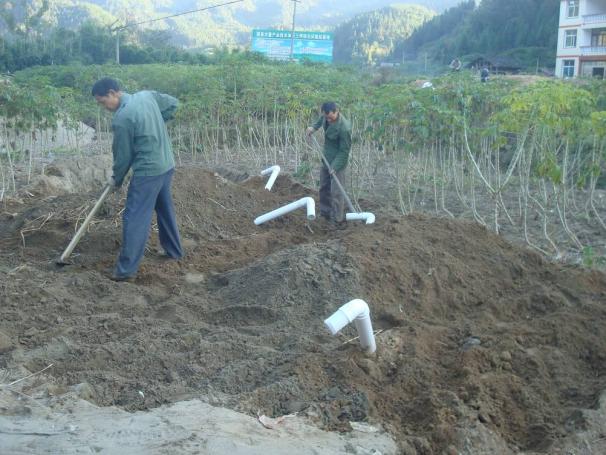
Figure 4 Cover with soil
2.4.3 Covering with waterproof cloth
After adding the soil layer, cover it with a waterproof cloth (see Figure 5). This cloth is crucial for keeping rainwater and other surface water from seeping into the storage pit. If water gets in, the humidity inside the pit will rise sharply. That kind of damp environment makes fungi and bacteria grow quickly and that’s what causes the stems to rot.
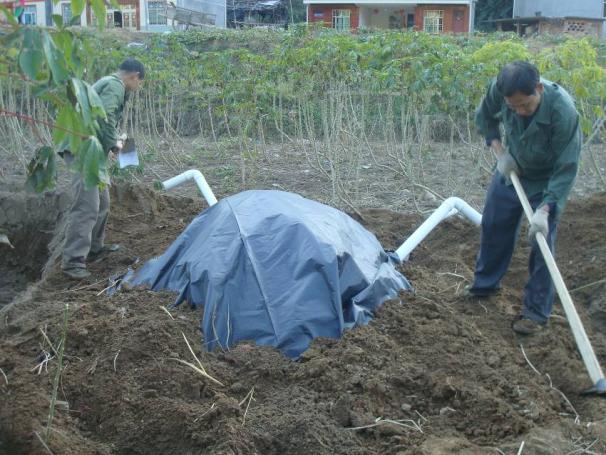
Figure 5 Cover with waterproof cloth
2.4.4 Digging drainage ditches
Drainage ditches are built to carry rainwater and other surface water away from the storage pit. This adds another layer of protection against water seeping into the pit.
Dig the ditches at a proper distance from the pit. Their depth and width need to be enough to handle the heaviest rainfall expected in the area. The ditches should also be sloped so water flows away from the pit, toward a lower area or a natural drain.
During the storage period, you must check and maintain the ditches regularly. This ensures they stay clear of clogs and work as they should.
2.5 For Storage Caves
2.5.1 Sealing the cave entrance
Once the stem bundles are arranged inside the cave, seal the entrance completely with mud bags. Stack the mud bags tightly on top of one another. Make sure there are no gaps between the bags when you seal the entrance (see Figure 6).
2.5.2 Digging drainage ditches
Just like with storage pits, digging drainage ditches around storage caves is a must-do step to stop water from seeping in. You need to excavate these ditches around the cave to keep rainwater from getting inside and damaging the stems.
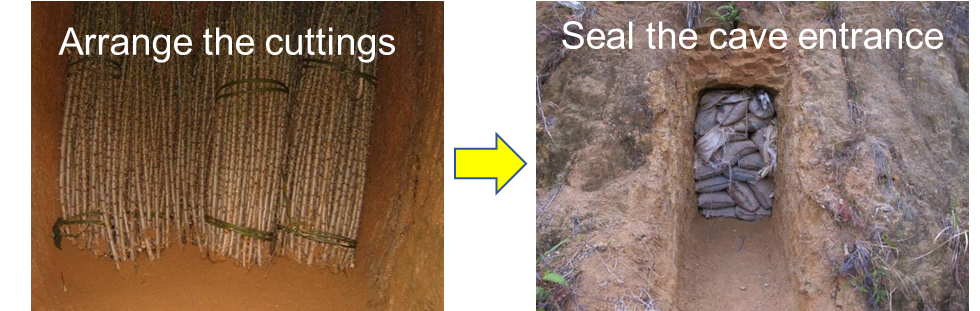
Figure 6. Operation process of the stem storage cave
Key Link Analysis
When arranging the stem bundles, keep them in separate small piles and avoid making the piles too large. The stems generate heat as they respire. Oversized piles will block heat from dissipating, and this could lead to pit burning.
Applicability
1.Effectiveness
Pit and cave storage methods for cassava stems have proven highly effective through widespread practical use. A major advantage of these methods is that they create and maintain a stable temperature and humidity environment inside the storage space. Thanks to this, the survival rate of stored stems can reach over 85%.
2. Environmental Conditions
Pit and cave storage for cassava stems works best in regions with specific climate and soil conditions.
For climate, this method is most effective in areas where winter temperatures drop below 15℃.
For soil, the ground should not contain large rocks or other hard objects. These hard materials can cause cracks in the walls of pits or caves, which allows water to seep in. As we noted before, poor drainage leads to water buildup around the storage structures, and this raises the risk of the cassava stems rotting.
Risks and Benefits
1.Costs and Benefits
These cassava stem storage methods are simple to operate, can be flexibly applied in fields according to actual conditions, and are low-cost and easy to use.
2. Risks and Emergency Measures
Before planting, if sudden temperature rises occur, promptly open the storage pits or caves for heat dissipation to prevent pit burning and stem damage.
Practical Cases
The effectiveness and practical value of pit and cave-based cassava stem storage technology have been fully proven through successful applications across various regions in China. These real-world practices provide solid evidence that the technology can effectively preserve cassava stem quality and support sustainable cassava cultivation.
In cities like Nanning, Guigang and Guilin in Guangxi Zhuang Autonomous Region, cassava stems stored in pits have maintained a quality rate of over 90% after overwintering (see Figure 7). Similarly, in places such as Fuzhou in Jiangxi Province and Sanming in Fujian Province, the quality rate of cassava stems stored in caves also exceeds 90% following overwintering storage (see Figure 8).


Figure 7. Cassava stems stored in pits


Figure 8. Cassava stems stored in caves
Conclusion
These practical cases not only validate the effectiveness and reliability of the cassava stem storage technology using pits or caves but also serve as valuable models for other cassava-growing regions both within China and around the world. They demonstrate that with simple, low-cost, and easy-to-operate storage methods, farmers can overcome the challenges of preserving cassava stems during non-planting periods, laying the foundation for sustainable and profitable cassava cultivation.

Category
Technical Solution
Contributor
Technical Guide to Cassava Stem Storage
Country
Technical Solution